さて、LEARNの第1回「ETH-dApp」のSection 2!
前回は、スマートコントラクトをHardhatで開発する過程を学んだ。
今回は・・・
Lesson 1. フロントエンド初期設定
をフォークして、
を作成して、git clone。
そして、npm install。
そして、npm run start。
※Cloud9のパブリックIPで繋げるように、Security Groupの変更。ポート8080をとりあえず全解放。
Metamaskはあるのでそのまま。
※学習時点ではそのままやっていたけど、開発用、学習用、本番用などでアカウントは分けた方が良い気がする。
Lesson 2. テストネットへのデプロイ
Alchemyを利用する。
The most powerful set of web3 development tools to build and scale your dApp with ease.
もっとも強力なweb3開発ツール(dAppを簡単にビルドし、スケールさせる)。
サインアップ
まずはサインアップ!
Planは3つ。
- Free: 0USD/month
- Growth: 49USD/month
- Enterprise: contact
とりあえず適当に入力してサインアップ完了。
上記クリックして登録してもらえるとGet $100+もらえるらしい(お互いに)ので、ぜひ。(せこい・・・)
アプリケーション作成
グローバルナビのAppsから+Create Appをクリック。
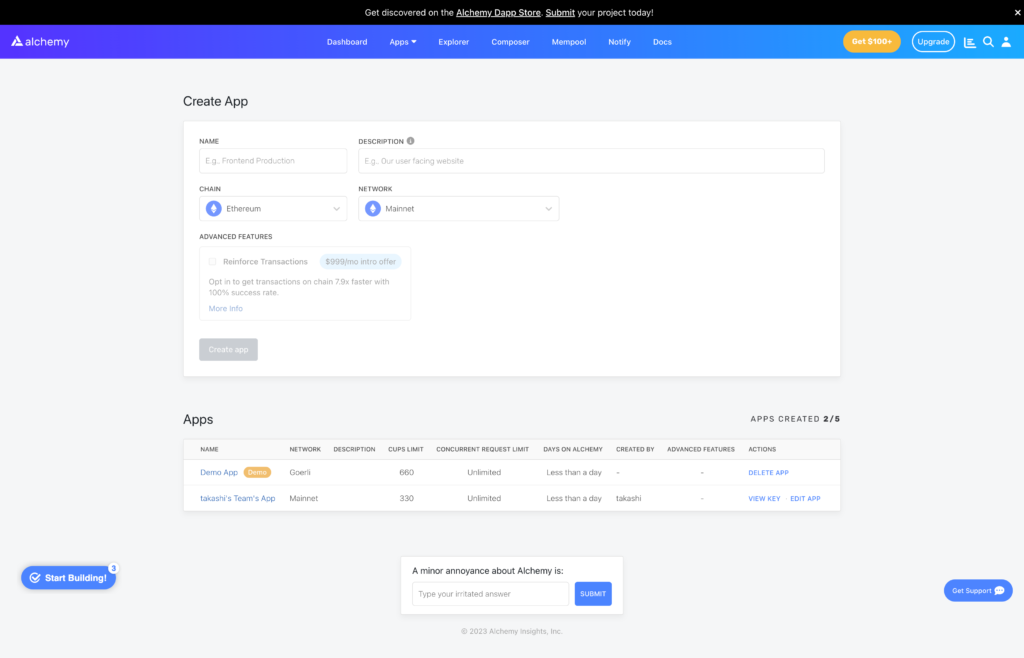
Goerli
ちなみに、今回NETWORKで選択したのはGoerli(テストネット)。
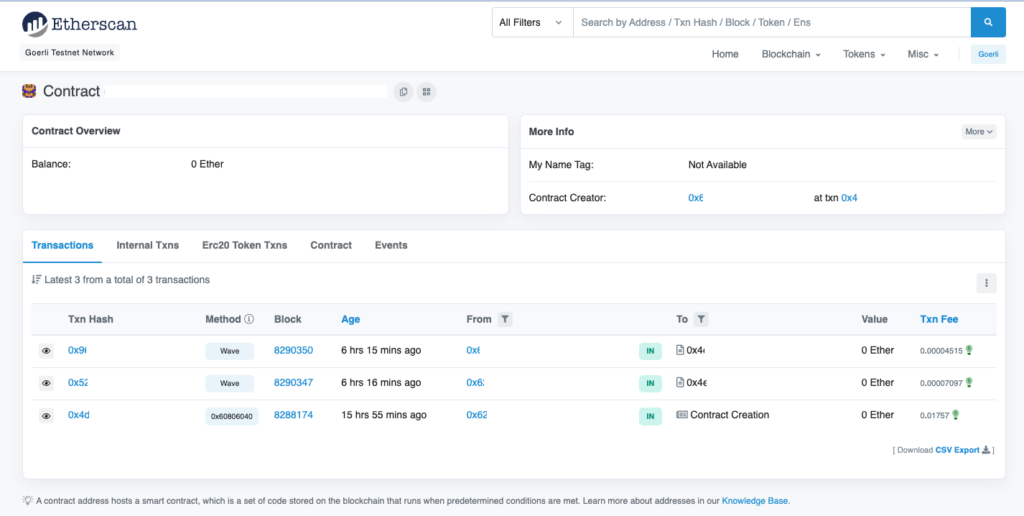
GoerliにはEtherscan(トランザクションが確認できるサイト)もある。
ちなみに、Etherscanとは・・・
Etherscan is a Block Explorer and Analytics Platform for Ethereum, a decentralized smart contracts platform.
Etherscanは、Ethereum用のブロック探索と分析のプラットフォーム。
上記サイトはドメイン的に正しい(goerli.etherscan.io)なというのはわかるんだけど、つい先日痛い目にあっているので、Faucetとかが本当に正しいのかが非常に心配・・・
goerlifaucet powered by Alchemy
例えば、このFaucet(https://goerlifaucet.com/)。
見た感じ、GoerliのFaucetだけど、こういうのが一番危ない・・・
恐る恐るサイトにアクセスしたみたけど、一応「Powered by Alchemy」があるので安心・・・だけど、こういうのが一番危ない。。。
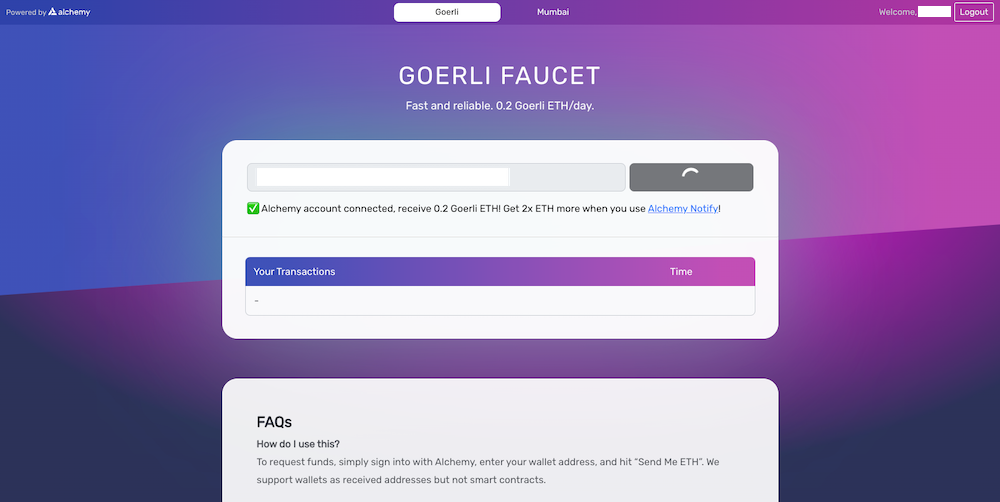
ここは大丈夫だけど。
で、Alchemyアカウントがあれば、Send Me ETHができる。
ちなみに、24時間に1回0.5 Goerli ETHがもらえます。
Chainlink
ここでもできると紹介があったけど・・・
あれ、、、これはtestnet ETHではなく、testnet LINK???
ここから遷移できるところは・・・・mudit.blogドメイン・・・嫌な予感・・・
の人がやっているFaucetで、超有名人ぽいっけど、なんか怖いからAlchemyだけで一旦終了。
※Goerli Testnetが利用できるようにMetaMaskを設定しないとダメだけど・・・すでに設定済みなので今回は何もしなかった。
→MetaMaskの設定だけで1記事余裕で書けそう。
コンフィグ編集
Goerliの設定をするために、./hardhat.config.jsを編集するんだけど・・・
require("@nomicfoundation/hardhat-toolbox");

/** @type import('hardhat/config').HardhatUserConfig */
module.exports = {
  solidity: "0.8.17",
  networks: {
    goerli: {
      url: "https://eth-goerli.g.alchemy.com/v2/xxxxxxx",
      accounts: ["xxxxxx"],
    },
  },
};
urlのところにalchemyで発行したURL、accountsのところには・・・なんとprivate key(accounts)を設定する必要がある・・・
さすがに、MetaMaskのアカウントを新しく作った方が良さそうなので、新規でアカウント作成。
アカウントをどう作ってどう管理していくかのベストプラクティスが欲しいところ。
で、新しく開発用アカウントを作ったので、24時間待たないと再度FaucetからテストEEHがもらえないので、仕方ないので、mudit.blogのFaucetからETHをもらおうとしたが・・・ってもらえない。
ETHが「0」となっているので、枯渇しているのか???
一旦スルーして、.gitignoreにhardhat.config.jsを追記して、とりあえず終了。
デプロイ
ETHないのにデプロイを試みる!!!
$ npx hardhat run scripts/deploy.js --network goerli
Error: insufficient funds for intrinsic transaction cost [ See: https://links.ethers.org/v5-errors-INSUFFICIENT_FUNDS ] (error={"name":"ProviderError","_stack":"ProviderError: HttpProviderError\n    at HttpProvider.request (/home/ec2-user/environment/ETH-dApp/my-wave-portal/node_modules/hardhat/src/internal/core/providers/http.ts:78:19)\n    at LocalAccountsProvider.request (/home/ec2-user/environment/ETH-dApp/my-wave-portal/node_modules/hardhat/src/internal/core/providers/accounts.ts:181:36)\n    at processTicksAndRejections (node:internal/process/task_queues:96:5)\n    at EthersProviderWrapper.send (/home/ec2-user/environment/ETH-dApp/my-wave-portal/node_modules/@nomiclabs/hardhat-ethers/src/internal/ethers-provider-wrapper.ts:13:20)","code":-32000,"_isProviderError":true}, method="sendTransaction", transaction=undefined, code=INSUFFICIENT_FUNDS, version=providers/5.7.2)
    at Logger.makeError (/home/ec2-user/environment/ETH-dApp/my-wave-portal/node_modules/@ethersproject/logger/src.ts/index.ts:269:28)
    at Logger.throwError (/home/ec2-user/environment/ETH-dApp/my-wave-portal/node_modules/@ethersproject/logger/src.ts/index.ts:281:20)
    at checkError (/home/ec2-user/environment/ETH-dApp/my-wave-portal/node_modules/@ethersproject/providers/src.ts/json-rpc-provider.ts:98:16)
    at /home/ec2-user/environment/ETH-dApp/my-wave-portal/node_modules/@ethersproject/providers/src.ts/json-rpc-provider.ts:265:24
    at processTicksAndRejections (node:internal/process/task_queues:96:5) {
  reason: 'insufficient funds for intrinsic transaction cost',
  code: 'INSUFFICIENT_FUNDS',
  error: ProviderError: HttpProviderError
      at HttpProvider.request (/home/ec2-user/environment/ETH-dApp/my-wave-portal/node_modules/hardhat/src/internal/core/providers/http.ts:78:19)
      at LocalAccountsProvider.request (/home/ec2-user/environment/ETH-dApp/my-wave-portal/node_modules/hardhat/src/internal/core/providers/accounts.ts:181:36)
      at processTicksAndRejections (node:internal/process/task_queues:96:5)
      at EthersProviderWrapper.send (/home/ec2-user/environment/ETH-dApp/my-wave-portal/node_modules/@nomiclabs/hardhat-ethers/src/internal/ethers-provider-wrapper.ts:13:20),
  method: 'sendTransaction',
  transaction: undefined
}
よし!当然エラー!!!!
そりゃ無理だよね。ガス代も払えないやつにコントラクトをデプロイさせるかという話!
あ、、、渡せばいいのか。
自分のアカウントから開発アカウントに普通に送ればいいんだと気づき、テストETH送金。
送金したことで開発アカウントと自分のアカウントが完全に繋がってしまったけど、ま、いっか。。。
盗まれたアカウントだから、全く新規のアカウントを作ろうと思ってたし、、、
はい、Send成功したので、再度デプロイ。
$ npx hardhat run scripts/deploy.js --network goerli
Deploying contracts with account:  xxxxx
Account balance:  150000000000000000
Contract deployed to:  xxxxx
Contract deployed by:  xxxxx
今度は無事デプロイ成功。
Etherscanでもしっかり確認できる。
Lesson 2は終了。
さすがに色々長かった・・・
Lesson 3. ウォレット接続
いよいよ、フロントエンドでウォレットと接続させます。
これだけでもログインアプリが簡単に作れないかなぁなんて思ったりしています。
App.js編集(MetaMaskがあることの確認)
  const checkIfWalletIsConnected = () => {
    const { ethereum } = window;
    if (!ethereum) {
      console.log("Make sure you have MetaMask!");
    } else {
      console.log("We have the ethereum object", ethereum);
    }
  };
  useEffect(() => {
    checkIfWalletIsConnected();
  }, []);
MetaMaskがあるブラウザでは「We have the…」が表示され、ないブラウザでは「Make sure you…」が表示された。
App.js編集(ウォレット接続)
checkIfWalletIsConnected内に追記。
      const accounts = await ethereum.request({ method: "eth_accounts" });
      if (accounts.length !== 0) {
        const account = accounts[0];
        console.log("Found an authorized account:", account);
        setCurrentAccount(account);
      } else {
        console.log("No authorized account found");
      }
ethereum.request({ method: "eth_accounts" })でアクセス許可済みのアカウントを取得。
ここではあればcurrentAccountにセット、なければ「ないよと」ログ出力をしてるだけ。
次に新規function。
  const connectWallet = async () => {
    try {
      const { ethereum } = window;
      if (!ethereum) {
        alert("Get MetaMask!");
        return;
      }
      const accounts = await ethereum.request({
        method: "eth_requestAccounts",
      });
      console.log("Connected: ", accounts[0]);
      setCurrentAccount(accounts[0]);
    } catch (error) {
      console.log(error);
    }
  };
ethereum.request({ method: "eth_requestAccounts" });で、アカウント接続確認。
View側は
        {!currentAccount && (
          <button className="waveButton" onClick={connectWallet}>
            Connect Wallet
          </button>
        )}
        {currentAccount && (
          <button className="waveButton" onClick={connectWallet}>
            Wallet Connected
          </button>
        )}
で、 connectWalletを呼び出す。
※なんで、Wallet Connectedの方もbuttonにして、かつonClickでconnectWalletを呼び出せるようにしているのか・・・
ということで、ウォレット接続完了。
※ethereumのAPI
を参照。
このドキュメントはMetaMaskのなんだけど、他のウォレットだとどうなんだろう・・・ethereumのインターフェースが一緒なのかな???
Lesson 4. フロントエンドからコントラクトを呼び出す!
まずethersのインポートとabiのインポート。
import { ethers } from "ethers";
import abi from "./utils/WavePortal.json";
abiは、バックエンドのプロジェクトのartifacts/contracts/WavePortal.sol/WavePortal.jsonをそのままコピーして、フロントエンドのプロジェクトのsrc/utilsに置いて、importしてあげればよい。
wave functionの実装。
  const wave = async () => {
    try {
      const { ethereum } = window;
      if (ethereum) {
        // Contract生成
        const provider = new ethers.providers.Web3Provider(ethereum);
        const signer = provider.getSigner();
        const wavePortalContract = new ethers.Contract(
          contractAddress,
          contractABI,
          signer
        );
        // 一旦読み取り実行!
        let count = await wavePortalContract.getTotalWaves();
        console.log("Retrieved total wave count...", count.toNumber());
        // 書き込み実行!
        const waveTxn = await wavePortalContract.wave();
        console.log("Mining...", waveTxn.hash);
        await waveTxn.wait();
        console.log("Mined -- ", waveTxn.hash);
        // 読み取り実行!
        count = await wavePortalContract.getTotalWaves();
        console.log("Retrieved total wave count...", count.toNumber());
      } else {
        console.log("Ethereum object doesn't exist!");
      }
    } catch (error) {
      console.log(error);
    }
  };
大事なのは・・・new ethers.Contractかな。
引数としては3つ。
- コントラクトアドレス: デプロイ先のアドレス。Etherscan(Goerli)でも取って来れそう。
- コントラクトABI: Application Binary Interface -> https://www.quicknode.com/guides/smart-contract-development/what-is-an-abi
- provider or signer: providerを渡すと読み取り専用の機能、signerだと読み取りと書き込みの機能が利用可能。
2つ目のABIをしっかり理解しておいた方が良さそう。
読み込みはガス代かからないけど、書き込みはガス代がかかる。
await waveTxn.wait();
で、書き込みを待たないとダメ。
無事書き込みができた。
ソースコード全体で言うと、awaitが多かったりするので、記載忘れで、変なバグが出そう。
素晴らしいフレームワークが出てくることを期待したい。
ここら辺はもしかしてWASMというものが代替になってきたりするのかな???
ということで、Section2は終わり。
まとめ
- フロントエンドはreactで作る
- テストネットにデプロイする場合(本番もかも?!)はAlchemyを利用する
- フロントエンドからバックエンドを呼び出す
今回は、書き込みもできるようにしたけど、読み込みだけのアプリケーションならユーザ側はガス代使わずできるっぽいので、そういうのを作ってウォレットを広めていくというのもいいかなぁとか思ったりした。
「Launch App」のようにして、MetaMaskを接続させて、アプリケーションを起動するのを見るけど、あんな感じのものを作れるようになったのはひとつ成長。